Android是怎么加载布局的?
通过这次了解,把Android加载布局的方式彻底了解清楚。
代码基于:5.1.1 r1
Grepcode结合AndroidStudio源码,可以方便我们更好的理解加载过程。
我们准备从Activity的setContentView方法开始来说(为什么从这个方法开始?)。
1、Activity的setContentView
Activity.java1
2
3
4
5
public void setContentView(int layoutResID) {
getWindow().setContentView(layoutResID);
initWindowDecorActionBar();
}
attach()方法里给window赋值。1
2
3
4
5
6
7
8
9final void attach(Context context, ActivityThread aThread,
Instrumentation instr, IBinder token, int ident,
Application application, Intent intent, ActivityInfo info,
CharSequence title, Activity parent, String id,
NonConfigurationInstances lastNonConfigurationInstances,
Configuration config, String referrer, IVoiceInteractor voiceInteractor) {
attachBaseContext(context);
mFragments.attachActivity(this, mContainer, null);
mWindow = PolicyManager.makeNewWindow(this);
- getWindow()实际上最终是mWindow = PolicyManager.makeNewWindow(this)初始化的,是一个 PhoneWindow 对象。
PolicyManager类创建时(单例模式,只有一个实例),类com.android.internal.policy.impl.Policy随之初始化,PolicyManager.makeNewWindow实际上调用的是Policy的makeNewWindow方法,此为代理模式。该类提供了多种创建对象的方法。从该类名字可以猜测出,创建窗口使用的是策略模式。
1
2
3
4
5
6
7
8
9
10
11
12
13
14
15
16
17
18
19
20
21
22
23
24
25
26
27
28
29
30
31
32
33
34
35
36
37
38
39
40
41
42
43public final class PolicyManager {
private static final String POLICY_IMPL_CLASS_NAME =
"com.android.internal.policy.impl.Policy";
private static final IPolicy sPolicy;
static {
// Pull in the actual implementation of the policy at run-time
try {
Class policyClass = Class.forName(POLICY_IMPL_CLASS_NAME);
sPolicy = (IPolicy)policyClass.newInstance();
} catch (ClassNotFoundException ex) {
throw new RuntimeException(
POLICY_IMPL_CLASS_NAME + " could not be loaded", ex);
} catch (InstantiationException ex) {
throw new RuntimeException(
POLICY_IMPL_CLASS_NAME + " could not be instantiated", ex);
} catch (IllegalAccessException ex) {
throw new RuntimeException(
POLICY_IMPL_CLASS_NAME + " could not be instantiated", ex);
}
}
// Cannot instantiate this class
private PolicyManager() {}
// The static methods to spawn new policy-specific objects
public static Window makeNewWindow(Context context) {
return sPolicy.makeNewWindow(context);
}
public static LayoutInflater makeNewLayoutInflater(Context context) {
return sPolicy.makeNewLayoutInflater(context);
}
public static WindowManagerPolicy makeNewWindowManager() {
return sPolicy.makeNewWindowManager();
}
public static FallbackEventHandler makeNewFallbackEventHandler(Context context) {
return sPolicy.makeNewFallbackEventHandler(context);
}接下来看Policy的makeNewWindow方法。
1
2
3
4
public Window makeNewWindow(Context context) {
        return new PhoneWindow(context);
}
Activity的 getWindow().setContentView(layoutResID);最终实际上是PhoneWindow调用了setContentView.
2、PhoneWindow的setContentView
Activity中有一个成员为Window,其实例化对象为PhoneWindow,PhoneWindow为抽象Window类的实现类.
PhoneWindow.java
1 | public void setContentView(int layoutResID) { |
可以看出,先是初始化decorView,然后初始化我们传入的布局,并添加到decorView上,最后调用Callback回调。
2.1 初始化decorView,DecorView是FrameLayout的子类,PhoneWindow的内部类。
1 | private void installDecor() { |
1 | protected ViewGroup generateLayout(DecorView decor) { |
所以说必须在setContentView之前调用requestFeature!Activity时设置的theme或者feature的2种方式。1
2
3
4
5
6
7
8
9
10
11
12
13
14
15
16
17通过java文件设置:
requestWindowFeature(Window.FEATURE_NO_TITLE);
通过manifest.xml文件设置:
<?xml version="1.0" encoding="utf-8"?>
<manifest xmlns:android="http://schemas.android.com/apk/res/android"
package="com.example.application" >
<application
......
android:theme="@android:style/Theme.Black.NoTitleBar" >
......
</application>
</manifest>
接下来,引用参考资料的例子:
主界面布局文件:1
2
3
4
5
6
7
8
9<RelativeLayout xmlns:android="http://schemas.android.com/apk/res/android"
android:layout_width="match_parent"
android:layout_height="match_parent">
<TextView android:text="@string/hello_world"
android:layout_width="wrap_content"
android:layout_height="wrap_content" />
</RelativeLayout>
我们将主题设置为NoTitleBar,所以在generateLayout方法中的layoutResource变量值为R.layout.screen_simple,所以我们看下系统这个screen_simple.xml布局文件,如下:
1 | <LinearLayout xmlns:android="http://schemas.android.com/apk/res/android" |
布局中,一般会包含ActionBar,Title,和一个id为content的FrameLayout,这个布局是NoTitle的。
再来看下上面这个App的hierarchyviewer图谱,如下:

然后回过头可以看见上面PhoneWindow类的setContentView方法最后通过调运mLayoutInflater.inflate(layoutResID, mContentParent);或者mContentParent.addView(view, params);语句将我们的xml或者java View插入到了mContentParent(id为content的FrameLayout对象)ViewGroup中。最后setContentView还会调用一个Callback接口的成员函数onContentChanged来通知对应的Activity组件视图内容发生了变化.
####Callback
Callback从何而来?
Window.java1
2
3
4
5
6/**
* Return the current Callback interface for this window.
*/
public final Callback getCallback() {
return mCallback;
}
1 | public void setCallback(Callback callback) { |
Activity.java1
2
3
4
5final void attach(Context context, ActivityThread aThread,
......
mWindow.setCallback(this);
......
}
也就是说Activity类实现了Window的Callback接口。那就是看下Activity实现的onContentChanged方法。如下:1
2public void onContentChanged() {
}
onContentChanged是个空方法。那就说明当Activity的布局改动时,即setContentView()或者addContentView()方法执行完毕时就会调用该方法。
所以当我们写App时,Activity的各种View的findViewById()方法等都可以放到该方法中,系统会帮忙回调。
2.2 mLayoutInflater.inflate(layoutResID, mContentParent);将我们的资源文件通过LayoutInflater对象转换为View树,并且添加至mContentParent视图中(其中mLayoutInflater是在PhoneWindow的构造函数中得到实例对象的LayoutInflater.from(context);)。
剩下的全部交给LayoutInflater了。下一篇再讲缕清吧。
setContentView整个过程主要是如何把Activity的布局文件或者java的View添加至窗口里,重点概括为:
创建一个DecorView的对象mDecor,该mDecor对象将作为整个应用窗口的根视图。
依据Feature等style
theme创建不同的窗口修饰布局文件,并且通过findViewById获取Activity布局文件该存放的地方(窗口修饰布局文件中id为content的FrameLayout)。
将Activity的布局文件添加至id为content的FrameLayout内。
当setContentView设置显示后会回调Activity的onContentChanged方法。Activity的各种View的findViewById()方法等都可以放到该方法中,系统会帮忙回调。
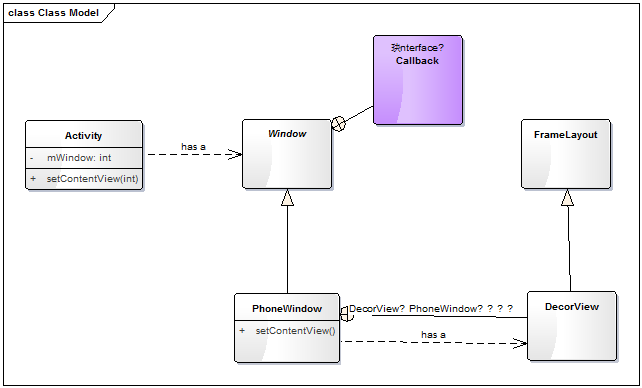
如下就是整个Activity的分析简单关系图:
图片来自参考资料。
参考资料:
Android应用setContentView与LayoutInflater加载解析机制源码分析
Android应用程序窗口(Activity)的窗口对象(Window)的创建过程分析
